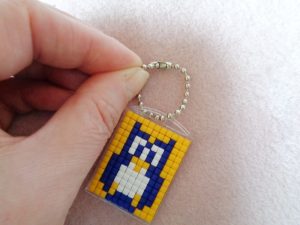
Our new Pixelbobby keyring kits have proven to be very popular and I have to say I am thoroughly enjoying making them myself, they’re very addictive. These mini mosaic kits are a new direction for us but we felt they would fit in with our products perfectly, especially with our jewellery makers that also offer keyrings as part of their handmade items.
They are perfect for both hobbyists and professional crafters alike and you are very welcome to sell the items you make with ours and Pixelhobby UK’s blessing. We decided to start with the keyring kits to ease you in gently to this unique craft and depending on your feedback we have the option of adding magnets and full size pictures to our range.
If you’re not familiar with Pixelhobby, or you’ve bought a kit but not made yours yet then this blog post is perfect for you. I’m going to walk you through the basics and will also be adding a video to our You Tube channel soon.
Firstly choose your Pixelhobby mini mosaic keyring kit, that can be tough to start with. For this tutorial I’ve chosen the owl kit.

Open your packet and you’ll find 3 sheets of pixels, small 2mm squares which are used to make the design, a blank clear plastic keyring base plate, a chain and the chart showing you which colour goes where, you’ll find that on the reverse of the main picture.

You will also need a pair of tweezers, my preference is to use the angled type. I will give you a tip before we start, it’s much easier to use to place the pixels if you hold the tweezers like an L so they resemble a hockey stick with the flat part towards the surface you’re working on. If you hold them the other way with the bend in the tweezers pointing up you’re more likely to ping the pixels across the table as I did the first time I tried.

I like to follow the chart whilst having it at the side of me however, the chart is exactly the same size as the base plate so you can overlay it if you prefer. As the base plate is clear you can easily see the chart through it. To make the design image simply pull a coloured pixel off the sheet, they’re held on by little pips, and place over the corresponding pin that sticks up from the base plate. Push down with your finger or your tweezers to fix it in place and repeat. You may find it easier to work in rows or in colours, I’ve tried both ways and found it makes no difference. The pins are rigid so ensure equal spacing of your pixels meaning there are no problems fitting a pixel into a space in the middle of a cluster. Carry on filling all the spaces until you’ve completed your design and then it’s time to add the key chain.

To join the two ends of the chain together lay the finished keyring down with the open part of the connector facing you and lay the last ball of the chain into the gap. Then, holding on to the connector, slightly pull the chain left and down to secure. Now you have a finished keyring.
You could add the finished keyring to a bag before securing if you want to use it as a permanent charm or alternatively add a large split ring so you can add and remove keys as required or add it to your handbag as a decoration. We have 25mm keyring loops in stock and will be adding more variations for you to choose from very soon.

As you can see there are way more pixels in your pack than you need so don’t panic if you do ping a few across the carpet, you have plenty. There are lots of options for using the leftover pixels on future projects and we’ll be getting in some extra supplies in the future so you will be able to purchase base plates and chains on their own. We thought the kits would be the best place to start with a view to stocking the components separately as soon as we know what you our customers want.
I mentioned before in a previous post we are delighted to be the first official stockist of Pixelhobby UK products in Ireland and I can’t wait to get feedback from you all so don’t be shy, share your pics and comments with us. As always you can leave a review on our website for these and any of our products as well as post on our Facebook page, in our customer group and here on our blog.
Until next time, happy crafting!
Trish x
